📋 What you'll need: The accounts you created in the Account Setup Guide — your GA4 Measurement ID, your Meta Pixel ID, your Google Ads Customer ID — plus admin access to your website
⏱ Time: 3–5 hours, one-time setup
✅ Output: Every visit, opt-in, and sale tracked correctly from your first day of traffic
⏱ Time: 3–5 hours, one-time setup
✅ Output: Every visit, opt-in, and sale tracked correctly from your first day of traffic
⚠️ A note on accuracy.
GA4, Meta, and Google Ads change their menus and button labels often — sometimes every few months. We keep this page current, but a label or location may have shifted since our last update. Where that happens, we describe what you're trying to achieve so you can find it even if the wording differs. If a screen looks different from what's written here, look for the outcome described, not the exact words.
Why Do This Before Starting Your Modules
This page sets your tracking up first, so every visit, opt-in, and sale is recorded from your first day of traffic.
What skipping tracking actually costs
- You won't know which channel brings customers and which wastes money.
- You won't be able to tell a broken funnel from a slow week.
- You'll make decisions on instinct rather than on what the numbers actually show.
- Setting this up now takes a few hours. Diagnosing a broken funnel later takes weeks, and the lost data never comes back.
Before You Start — Accounts & Access
Complete the Account Setup Guide before this page. Then confirm access to everything below.
Google Account ready — same one you'll use for GA4 and Search Console
GA4 account created — Measurement ID (G-XXXXXXXX) saved from Account Setup Guide
Meta Business Manager active — business.facebook.com dashboard accessible
Meta Pixel created — Pixel ID (15–16 digits) saved from Account Setup Guide
Google Ads account created — Customer ID (123-456-7890) saved from Account Setup Guide
Website admin access confirmed — Shopify / Squarespace / Webflow / WordPress
Google Search Console — will set up in Step 6 below
The Setup — Work Through Each Step in Order
Click each step to expand it. Work through them in order. Collapse when done.
Step 1 — Install GA4 and Track Your Conversions (~30 min)
The goal: get GA4's tracking code onto every page of your site so it records visits, then tell it which actions count as conversions. How you install it depends on your platform — use the native method where one exists, since it installs the code everywhere automatically and updates itself.
Install GA4 on your website
📌 Find your Measurement ID
analytics.google.com → Admin (bottom left gear) → Data Streams → click your stream → Measurement ID is at the top right (starts with G-).
analytics.google.com → Admin (bottom left gear) → Data Streams → click your stream → Measurement ID is at the top right (starts with G-).
Menus move around in GA4 — if Admin isn't at the bottom left, look for a gear or settings icon. You're looking for Data Streams, and inside your stream, the G- code.
Install it — by platform
Shopify: In your Shopify admin, look for the Google & YouTube channel (or your GA4 app), connect your Google account, and select your GA4 property. Shopify installs the tag across your store automatically.
Squarespace: Settings → look for the Analytics or External API keys area → paste your Measurement ID into the Google Analytics field.
Wix: Settings → Marketing Integrations → Google Analytics → connect and paste your Measurement ID.
Webflow: Project Settings → Integrations → paste your Measurement ID into the Google Analytics field, then publish.
WordPress: use a plugin like Site Kit by Google or GA4-compatible equivalent, and connect your property.
Custom site only: In GA4, on your data stream, use "View tag instructions" → "Install manually," copy the Google tag code, and paste it immediately after the opening <head> tag on every page.
The exact menu names above shift from time to time. The outcome is the same on every platform: find where your platform asks for a Google Analytics ID or connection, and give it your Measurement ID.
Set up Key Events so GA4 tracks your conversions
GA4 tracks page views automatically. You need to tell it which actions matter most by marking them as Key Events.
📌 Do you already have a website with a lead magnet live?
If yes — your opt-in and thank-you pages already exist — set up your Key Events now, as below.
If not — you haven't built your lead magnet or opt-in page yet — install your Measurement ID above so GA4 starts collecting visitor data today, then skip the Key Events for now. You'll build your lead magnet, opt-in page, and thank-you page in Module 2, and come back here to mark them once they're live.
What is a Key Event and how do I set one up?
A Key Event is any action on your website that represents a conversion — an opt-in, a purchase, a booking.
To mark an event as a Key Event:
- GA4 → Admin (bottom left gear) → Data display → Events
- Find the event name in the list
- Click the 3 verticals dots next to the event
- Select ‘Mark as key event’
Note: events only appear in this list after they've fired at least once. Complete a test action on your site first if they're missing.
The Key Events you need to set up:
generate_lead — opt-in conversion
This fires when someone gives you their email through your lead magnet and lands on your thank-you page. Your lead magnet is whatever you offer in exchange for an email — a free guide or checklist if you're a service business, or a first-order discount code if you sell products. Either way, this is your primary conversion signal.
To make it appear so you can mark it:
- Open your website in a separate tab
- Go to your opt-in page and complete the form with a test email
- Confirm you land on your thank-you page
- Back in GA4 → Admin → Events, generate_lead should now appear
- Toggle "Mark as key event" on
purchase — payment confirmed
This fires when someone completes a purchase and reaches your order confirmation page.
Shopify and other native integrations: purchase is tracked automatically. Go to Admin → Events, find purchase, and mark it as a key event.
Custom funnel: you'll need a purchase event on your confirmation page. Your payment platform (Stripe, PayPal, and similar) documents how to trigger it there. Once it's fired once, mark it as a key event the same way.
scroll_depth — did they read the page?
GA4's enhanced measurement fires a scroll event automatically when someone reaches 90% of the way down a page — no setup needed. It's a quick signal for whether people engage with a page or leave right away.
Check it in GA4 → Reports → Engagement → Events. You don't mark this as a key event — it's for insight, not conversion tracking.
If you want finer scroll tracking at 25%, 50%, and 75%, that needs Google Tag Manager and is optional. Most founders don't need it.
Verify GA4 is working
- GA4 → Admin → DebugView (in the left sidebar)
- Open a new tab and browse your website
- Events should appear in DebugView within 30 seconds
- Visit your opt-in page — confirm page_view fires
- If your pages are live, complete a test opt-in — confirm generate_lead fires on /thank-you
⚠️ Nothing showing in DebugView?
- Check your Measurement ID for typos — one wrong character stops it working
- Disable your ad blocker or test in a private/incognito window
- Confirm the tag is installed in <head> not in the footer
- Wait up to 2 minutes — DebugView has a slight processing delay
✅ Step 1 complete when:
- Your Measurement ID is installed and your own visit shows in DebugView
- If your lead magnet is live: generate_lead fires on your thank-you page and is marked as a key event, plus purchase if you sell online
- If your lead magnet isn't live yet: your tag is installed and collecting data, and you've noted to return here after Module 2
Step 2 — Install the Meta Pixel (~30 min)
The goal: get the Meta Pixel tracking on every page of your site, so Meta can see what visitors do after they click your ads. As with GA4, use your platform's native path where it exists — it installs the code across your site and often turns on the Conversions API at the same time.
📌 "Pixel" and "dataset" mean the same thing.
Meta now groups your Pixel inside something it calls a dataset. Your Dataset ID and your Pixel ID are the same number — Meta just shows different labels on different screens. When this page says Pixel and your screen says dataset, they're the same thing.
📌 Find your Pixel ID
- Go to Events Manager: business.facebook.com/events_manager
- Select your Pixel (Datasets) in the left sidebar
- Your Pixel ID is in the dataset's Settings — the same 15–16 digit number you saved during the Account Setup Guide
Have that ID ready for the install below.
Find your website platform and follow the instructions
Shopify
Shopify connects your Pixel through the official Facebook & Instagram app, which installs the Pixel and the Conversions API together — no code.
- Shopify admin → Settings → Apps and sales channels → Shopify App Store
- Search "Facebook & Instagram," install the official app by Meta
- Open it and connect your Meta Business account
- When prompted, select the Pixel you created in the Account Setup Guide — don't create a new one, or you'll split your data
- In the app's settings, find Customer data-sharing, turn it on, and set the level to Maximum
- Save
⚠️ Shopify users — set data sharing to Maximum.
Shopify defaults it lower, and the toggle sits a couple of clicks deep in the app settings. Maximum is what turns on the Conversions API and gives Meta full signal. On its own it typically lifts your Event Match Quality from around 6.5 to 8.
Squarespace
- Squarespace → Marketing → Meta Pixel & Ads
- Paste your Pixel ID into the Pixel ID field
- Save
Squarespace installs the Pixel across your site automatically. It does not turn on the Conversions API, so complete Step 3 below to add that.
Wix
- Wix → Settings → Marketing Integrations
- Find Facebook Pixel and click Connect
- Sign in to Meta and select your Pixel (dataset), then finish
Wix installs the Pixel across your site. To add the Conversions API, complete Step 3 below.
Webflow
- In Webflow, open your project → Settings (the three-dot menu on the site card)
- Go to the Apps & Integrations tab
- Find the Meta Pixel section and paste in your Pixel ID
- Save and publish your site
Webflow installs the Pixel across every page. It does not turn on the Conversions API, so complete Step 3 below to add that.
💡 Webflow needs a paid site plan for this.
Pasting your Pixel ID into Site settings requires a Basic, CMS, or Business site plan. On the free plan there's no native Pixel field. If you're on free, you'll add the Pixel with the one-click Conversions API in Step 3 through a native integration, or upgrade your plan.
WordPress or WooCommerce
- Install the official Meta for WooCommerce plugin
- Connect your Facebook account and Business Manager
- Select your Pixel
This sets up both the Pixel and the Conversions API.
Custom site or any other platform
- In Events Manager, enter your website URL — Meta checks for a partner integration
- If none is available, copy the base code Meta gives you
- Paste it before the closing </head> tag on every page of your site
⚠️ Connect one way only.
If you ever added Pixel code by hand — in your theme, code injection, or a tag manager — remove it before using a native integration. Running both double-counts every event. On Squarespace, check Settings → Advanced → Code Injection; on Shopify, check your theme.liquid <head>.
Add conversion events to specific pages
📌 These fire on specific pages, not sitewide. The base Pixel from Step 2 tracks page views everywhere. These events mark the specific actions that count as conversions — an opt-in, a purchase — on the specific pages where they happen.
📌 Check whether you already have these. If you installed your Pixel through a native integration (Shopify, WooCommerce, and similar), your standard events may already be tracked. Open Events Manager and look at your events list before adding anything — you may only need to confirm they're firing.
If your opt-in and thank-you pages aren't live yet, skip this for now. You'll build them in Module 2, then come back to set these events up.
For most sites: the Event Setup Tool (no code)
Meta's Event Setup Tool lets you set up events by clicking through your own website, instead of adding code. It's the easiest option for Squarespace, Wix, and most non-custom sites.
- In Events Manager, open your Pixel/Daraset and find the Event Setup Tool (Scroll down under the settings tab)
- Enter your website address. Meta opens your site with its own toolbar on top.
- Go to the page where the action happens — for a Lead, that's your thank-you page
- In the toolbar, choose "Track a URL." Pick the event (Lead), and tell Meta this event happens when someone visits this page.
- Save
Repeat for each event you need. The button labels may differ slightly, but the idea is the same: you walk Meta through your site and point out where each conversion happens, and Meta sets it up for you.
The tool's name or buttons may differ slightly. You're looking for the option to assign events by clicking your own site rather than writing code.
The three events, and where each fires
Lead — fires on your thank-you page, after someone completes your opt-in. This is your main conversion signal for Meta ads. Assign it to your thank-you page URL.
ViewContent — fires on your opt-in page when someone views it. It tells Meta who's interested even if they don't opt in, which helps you build warm audiences later. Assign it to your opt-in page URL.
Purchase — fires on your order confirmation page when a payment completes. On Shopify and other native integrations this is tracked automatically — you don't add it.
Custom sites only: adding events by code
If you're on a custom-built site with no native Meta integration:
- Events Manager → your Pixel/Dataset → Add Events → From the Pixel
- Select the event — Lead, ViewContent, or Purchase
- Copy the snippet
- Add it before </head> on that specific page only — not sitewide
For Purchase, set the value to match your product price if it isn't passed automatically.
✅ These events are set up when:
- Lead fires on your thank-you page after a test opt-in
- ViewContent fires on your opt-in page
- Purchase fires on your confirmation page, if you sell online
- Each one shows in Test Events, from two sources rather than doubling
Verify the Pixel is firing
- Install the Meta Pixel Helper Chrome extension — search "Meta Pixel Helper" in the Chrome Web Store, it's free
- Visit your website — the extension icon in your browser bar turns green if the Pixel is firing
- Click the icon — confirm your Pixel ID appears and PageView is listed
- Visit your opt-in page — confirm ViewContent fires
- Complete a test opt-in — confirm Lead fires on /thank-you
- Check Events Manager → Test Events tab for real-time confirmation
⚠️ Pixel not firing?
- Check your Pixel ID for typos — one wrong digit stops it working
- If you used a native integration, clear your site cache after saving, and confirm the integration is still connected
- If you added code manually, confirm it's before </head>, not in the footer
- Test in a private/incognito window with ad blockers off
✅ Step 2 complete when:
- Your Pixel is installed through your platform, or the base code is on your custom site
- Pixel Helper shows green and lists your Pixel ID
- Test Events shows PageView arriving
- Shopify users: data sharing is set to Maximum
Step 3 — Turn On The Meta Conversions API (~60 min)
The goal: send your conversion data to Meta directly from the server, not only from the browser. Browser tracking alone now misses a large share of conversions — ad blockers and privacy settings stop the rest from reaching Meta. The Conversions API fills that gap, which gives Meta better data to optimise your ads on.
📌 This used to need a developer. It doesn't anymore. In April 2026 Meta added a one-click Conversions API you turn on yourself in Events Manager — no code, no server, no fee. If an older guide tells you this step needs a developer or a paid tool, it's out of date.
If you set up your Pixel through Shopify, WooCommerce, or WordPress
The Conversions API is likely already on — those integrations turn it on with the Pixel. Confirm it:
- Go to Events Manager and open your dataset
- Check the Overview tab — you should see server events arriving alongside browser events
If it's already active, you're done with this step. Move on to verification.
If you installed the Pixel any other way
Turn on Meta's built-in Conversions API:
- Go to Events Manager and open your dataset
- On the Overview tab, look for the "Activate Conversions API" button or the “Get Started” button
- Click it and follow the prompts
That's it. Meta handles the setup on its side — the events your Pixel already sends are mirrored through the server connection and deduplicated automatically. No code, no cost.
💡 If you don't see the button.
Meta rolls this feature out gradually, so it may not have reached your account yet. If the "Activate Conversions API" button isn't there, your browser Pixel is still tracking and your ads will still run — check back in a few weeks, or set up the Pixel through a native platform integration (Step 2), which turns the Conversions API on for you.
Confirm it's working
You confirm both the Pixel and the Conversions API the same way — by using your own website. You don't test the server separately, and you don't need any developer tools.
- In Events Manager, open your dataset and go to the Test Events tab
- Under "Confirm your website’s events are setup correctly," enter your website address and open your site
- Click through as a customer would — visit a page, and if your pages are live, submit a test opt-in or test purchase
- Watch the feed. Your actions appear as events within a few seconds.
Look at the source label on each event. When both the Pixel and the Conversions API are working, your conversion shows as coming from Browser and Server — one event, two sources, deduplicated. That's what you want to see.
⚠️ Ignore the "test server events" / Graph API option.
Meta offers a separate way to test server events using developer tools. You don't need it — it's built for developers sending test data by hand. Using your real website, as above, tests both sides at once. If a screen asks you to register as a developer or open the Graph API Explorer, you're in the wrong place; go back and just use your site.
✅ Working correctly when:
- Your actions show up in Test Events within a few seconds
- Your conversion shows as Browser and Server — one event from two sources, not two separate events
⚠️ Only seeing the browser event, not the server one?
If your action shows up as Browser but never as Server, your Conversions API isn't sending yet. Two things to check:
- If you turned it on with Meta's one-click setup, give it a little time — the server connection can take a short while to start sending after you activate it.
- If you set up your Pixel through Shopify or WooCommerce, confirm the integration is still connected and data sharing is set to Maximum (from Step 2).
Once the server side is sending, your conversion will show as Browser and Server together.
Event Match Quality — check this later, once traffic is flowing
Once your ads are running and real visitors are coming through, Meta gives each event an Event Match Quality score out of 10. It measures how well Meta can match your events to real Facebook and Instagram accounts — better matching means better ad optimisation and attribution.
You won't see a score yet. It only appears after real events have come through, so at setup there's nothing to check. Note it now, and come back once your ads are live.
Once traffic is flowing:
- Events Manager → open your dataset. Go to the Overview tab.
- Open an individual event to see its Event Match Quality score
- Read it:
8–10 — Strong. Meta has good signal. Nothing to do.
5–7 — Fair. It works, but you can improve it by sending more customer information (like email and phone) through the Conversions API.
Below 5 — Weak. Worth checking that customer information is being passed with your events. Native integrations like Shopify do this automatically.
5–7 — Fair. It works, but you can improve it by sending more customer information (like email and phone) through the Conversions API.
Below 5 — Weak. Worth checking that customer information is being passed with your events. Native integrations like Shopify do this automatically.
If your score is fair or low
A low score almost always means Meta isn't getting enough customer information it can match on. In order of what to check:
Shopify or WooCommerce: go back to your Pixel connection and confirm data sharing is set to Maximum, not Optimized. This is the most common cause — the reduced setting holds back the customer data that drives your score. This is the setting from Step 2.
Confirm the Conversions API is actually firing: run the Test Events check again. If conversions show from only one source instead of two, the server connection that carries the richer data isn't sending — fix that first.
Collect more at opt-in and checkout: Meta matches on email, phone, name, and location. A form that only collects an email gives Meta one thing to match on. Collecting email and phone gives it two, and the score climbs. You'll set your opt-in form up in Module 2 — asking for a phone number as well as an email is worth it here.
Give it time: even with everything set up right, the score builds as more real events come through. A brand-new setup with little traffic reads low simply because the sample is small.
✅ Step 3 complete when:
- Your Conversions API is active, or confirmed already on through your platform
- Test Events shows conversions arriving from two sources, not doubling
Step 4 — Import Your Conversions into Google Ads (~10 min) ← Optional, only if running Google Ads
💡 Only if you're running Google Ads (Module 4).
You created your Google Ads account in the Account Setup Guide, so it's ready to use. This step imports your GA4 conversions into it so Google can see which clicks become leads and sales. If you're only running Meta, skip this — the Pixel and CAPI above handle your tracking. Come back to this page if you add Google Ads later.
You already did the hard part in Step 1. Your generate_lead and purchase Key Events are firing in GA4. This step imports those existing events into Google Ads as conversions — no new code, no new tags, nothing to install on your site.
Get Started
First, confirm GA4 is linked.
If you linked Google Analytics when you created your Google Ads account, this is already done. Confirm it:
- Google Ads → Tools → Data manager (or Linked accounts)
- Find Google Analytics (GA4) and check it shows as linked
- If it isn't, click Link, select your GA4 property, and confirm
While you're there: Settings → Account settings → confirm Auto-tagging is on. It usually is by default. This is what lets Google match ad clicks to conversions.
Import your Key Events as conversions
- Google Ads → Goals → Conversions → Summary
- +Create conversion action → Import
- Select Google Analytics 4 properties → Web
- Tick generate_lead (your opt-in) and purchase (your sale) → Import and continue
- Open each one and check the Count setting:
generate_lead → One (don't count the same lead twice)
purchase → Every (every sale counts)
Set your primary conversion
⚠️ Don't skip this — it's the step everyone misses.
When you import from GA4, Google Ads marks every conversion as Secondary by default, and Google never bids toward a Secondary conversion. If you leave it, Google won't optimise for your leads or sales at all. You have to promote your main one to Primary yourself.
Set your Primary conversion:
- Google Ads → Goals → Conversions → Summary → click the Goals tab
- Scroll to "All your goals" and find the goal holding your main conversion — "Leads" (containing generate_lead) for a service business, or "Sales" (containing purchase) for ecommerce
- Click Edit goal
- In the "Action optimization" column, set your main conversion to Primary:
Service business → generate_lead = Primary
Ecommerce → purchase = Primary - Set any others to Secondary (observe only) — you want only ONE primary, or Google's bidding gets confused and can double-count
- Click Save
⚠️ One Primary conversion, not several. It's tempting to mark everything Primary so it all "counts," but that backfires — Google bids toward all of them at once and your results get muddled. Pick the single action that is real money to you (a booked lead, or a sale) as your one Primary. Everything else stays Secondary.
Verify it's working
- Import takes up to 24 hours to show — that's normal
- Once your campaign is live, click your own ad or complete the tracked action on your site, then check Goals → Conversions after a day
- Read the Status column:
Recording — working, nothing to do
No recent conversions — normal before you've launched or had any conversions; recheck after 24 hours
Inactive or error — the GA4 link or Key Event needs checking; confirm the event is still marked as a Key Event in GA4
✅ Step 4 complete when:
- Google Ads linked to your GA4 property
- Auto-tagging is ON
- generate_lead and purchase imported as conversion actions from GA4
- Your one main conversion (generate_lead for service, purchase for ecommerce) is set to Primary; everything else is Secondary
Step 5 — Set Up UTM Parameters (~30 min)
The goal: tag the links in your ads and posts so GA4 can tell you exactly where each visitor came from. Without UTMs, paid and social traffic often lands in GA4 as "Direct," and you lose the trail back to what's working.
📌 Google Ads is the exception — don't add UTMs to it.
Google Ads tags its own links automatically (this is auto-tagging, which you confirmed in the Account Setup Guide). If you add manual UTMs on top, they override Google's tracking and break your cost-per-click data. Leave Google Ads links alone. Use UTMs for everything else — Meta ads, email, social posts, influencer links.
The rules — read before creating any UTMs
⚠️ UTM rules — never break these
- Always use lowercase — utm_source=Facebook and utm_source=facebook are different sources in GA4
- No spaces — use hyphens: welcome-sequence not welcome sequence
- Never add UTMs to links inside your own website — only on links you share externally
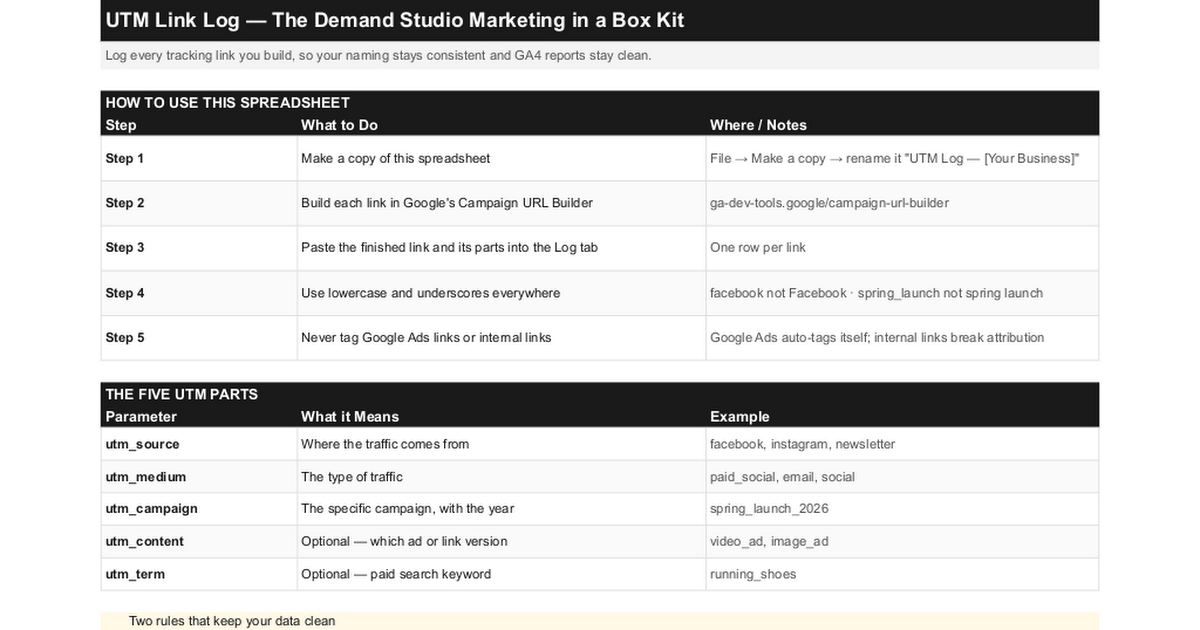
- Log every UTM you create in a spreadsheet — one row per link
- Test every UTM before it goes live — paste the link in your browser then check GA4 DebugView
How to build a UTM link
Use Google's Campaign URL Builder — search "Campaign URL Builder," or go to ga-dev-tools.google/campaign-url-builder. Fill in:
- Website URL: the page you're sending people to
- Campaign source: where it's coming from (facebook, instagram, newsletter)
- Campaign medium: the type of traffic (paid_social for paid ads, email, social for organic posts)
- Campaign name: the specific campaign (spring_launch_2026)
The builder assembles the tagged link at the bottom. Copy it and use that in your ad or post instead of the plain URL.
⚠️ Never put UTMs on links inside your own site.
UTMs are only for links coming from outside — an ad, an email, a social post. If you tag a link that goes from one page of your site to another, GA4 resets the visitor's source to that internal link, and a sale that came from a Google search gets credited to your own menu button instead. Tag external links only.
Log every UTM link you build in your UTM Link Log
So your naming stays consistent and you can find your links again later. Make your own copy first: File → Make a copy → rename it "UTM Link Log — [Your Business].”
Test that it works
- Build one UTM link and open it in your browser
- In GA4, go to Reports → Realtime
- You should see your visit appear, with the source and medium you set
If the source shows up as you named it, your tagging works. Test one link this way before you use UTMs on a real campaign — fixing tags after you've sent an email or launched an ad is far harder than checking one link now.
✅ Step 5 complete when:
- You've built and tested at least one UTM link
- It shows the correct source and medium in GA4 Realtime
- You're logging your links in your UTM Link Log
- No UTMs on your Google Ads links or any internal links
Step 6 — Setup Google Search Console (~20 min)
Search Console shows how Google sees your website — which search terms bring people to your pages, whether your pages are being indexed, and whether there are any technical issues. Set it up now so you have a baseline from Day 1.
Add your property and verify ownership
- Go to search.google.com/search-console
- Click Add Property
The easy path: verify with GA4 (You installed it in Step 1)
Because GA4 is already on your site, Search Console can often verify you in one click.
- Choose the URL prefix option and enter your full site address, including https:// — for example https://www.yourbusiness.com
- In the list of verification methods, look for Google Analytics
- Click Verify
If your GA4 tag is live and you're signed in with the same Google account, it verifies instantly — no DNS, no code.
The other path: verify by DNS (Domain property)
If the GA4 method isn't offered, or you want one property that covers every version of your site, use DNS verification:
- Choose the Domain option and enter your domain — yourbusiness.com, without https:// or www
- Google gives you a TXT record — copy it
- Go to your domain provider (where you bought your domain — GoDaddy, Namecheap, Squarespace Domains, Cloudflare) and open its DNS settings
- Add a new TXT record: set the Host or Name to @, and paste Google's record into the Value field
- Save, then go back to Search Console and click Verify
DNS changes can take anywhere from a few minutes to a day to register. If it fails the first time, wait an hour and click Verify again — the record usually just hasn't propagated yet. Leave the record in place permanently; Google re-checks it.
Submit your sitemap and link to GA4
- Once verified, open Sitemaps in the left menu and submit your sitemap — usually yourbusiness.com/sitemap.xml
- Link Search Console to GA4: in GA4, go to Admin → Product Links → Search Console links, and link your verified property
Linking means your search terms show up inside GA4 alongside the rest of your data.
✅ Step 6 complete when:
- Search Console property verified — green checkmark showing
- Sitemap submitted successfully
- Search Console linked to GA4
Step 7 — Google Tag Manager ← Optional — Most founders can skip this
Google Tag Manager is a free tool that manages all your tracking in one place, so you can add or change tags without touching your site's code. It's genuinely useful — but for how this Kit sets things up, most founders don't need it.
📌 You've already done what GTM would do for you.
GTM's main job is adding tracking without a developer. But you installed GA4 through your platform (Step 1), your Pixel through your platform (Step 2), turned on the Conversions API in one click (Step 3), and set your conversion events with Meta's no-code tool. Those are the exact jobs GTM exists for, and they're already done. Adding GTM on top would mean more setup for no extra benefit at this stage.
⚠️ Read this before deciding whether to set up GTM
GTM is an intermediate-level tool. The basic setup — installing the container and adding GA4 and Meta Pixel via templates — is doable without coding. But it requires you to be comfortable with concepts like tags, triggers, and variables, and to edit your website's HTML to install the container itself.
If you are not comfortable editing your site's code, skip this entirely. Your native platform
integrations from Steps 1 and 2 do the same job reliably.
GTM becomes worth the effort later — when you're managing multiple tags, adding custom events, or tracking complex user behaviour. It is not necessary to get your tracking stack working correctly right now.
📌 Who should set up GTM now
✓ You're on a custom-built site with no native GA4 or Pixel integration
✓ You're comfortable editing HTML
✓ You want one central place to manage all tags going forward without touching site code again
✓ You have a developer available if something breaks
✓ You're comfortable editing HTML
✓ You want one central place to manage all tags going forward without touching site code again
✓ You have a developer available if something breaks
Who should skip it for now
✗ You're on Shopify, Squarespace, Wix, Webflow — your native integrations already handle GA4 and Pixel correctly
✗ You've never edited site code before
✗ You're mid-setup and don't want to introduce a new variable right now
✗ You've never edited site code before
✗ You're mid-setup and don't want to introduce a new variable right now
Setting it up
GTM is a tool in its own right, and setting it up well is beyond what this Kit covers — it's not needed to get your tracking working, which you've already done in Steps 1 through 6. If you decide you want it later, Google's own guide is the most reliable source, and it stays current as the tool changes.
⚠️ The one thing to get right if you do set it up.
Don't run GTM on top of your existing tags. If you move GA4 or your Pixel into GTM, remove the native versions you installed in Steps 1 and 2 first — running both sends every event twice and doubles your numbers. Move your tags into GTM, don't add GTM alongside them.
✅ You're done with tracking setup.
GTM is optional, and most founders skip it. Your GA4, your Pixel, and your conversion tracking are all working without it.
Verification Checklists — Tick Everything Before Moving On
GA4
⚠️ If your opt-in and thank-you pages aren't live yet, skip the event-specific ticks below — you'll complete them after Module 2, as noted in Step 1.
GA4 tag firing on all pages — confirmed in DebugView
Measurement ID correct — starts with G-, no typos
generate_lead marked as Key Event — fires on /youthank-you-page after test opt-in
purchase marked as Key Event — fires on order confirmation page
Real-time report shows you browsing the site
Meta Pixel & CAPI
⚠️ If your opt-in and thank-you pages aren't live yet, skip the event-specific ticks below — you'll complete them after Module 2, as noted in Step 1.
Pixel Helper shows green on all pages
ViewContent fires on opt-in or product page
Lead fires on /your-thank-you-page after test opt-in
Purchase fires on order confirmation page
CAPI active — Events Manager shows Active status
No duplicate events in Test Events
Google Ads Conversions (only if running Google Ads)
Google Ads linked to your GA4 property
Auto-tagging is ON (Settings → Account settings)
generate_lead and purchase imported as conversion actions from GA4
Your main conversion set to Primary (generate_lead for service, purchase for ecommerce) — everything else Secondary
Conversion status shows "Recording" (or "No recent conversions" if not yet launched — not "Inactive")
UTM & Attribution
UTM Link Log copied
All live ad links have UTM parameters
Correct source and medium appearing in GA4 Acquisition report
No UTMs on any internal site links
Search Console
Search Console property verified
Sitemap submitted
Search Console linked to GA4
Troubleshooting — If Something Isn't Working
GA4 DebugView shows no events
- Check your Measurement ID for typos — one wrong character stops it working
- Disable your ad blocker or test in a private/incognito window
- Confirm the tag is in </head> if you installed manually
- Wait up to 2 minutes — DebugView has a slight processing delay
- If using a native CMS integration, confirm you saved and published after adding the ID
Meta Pixel Helper shows red or not detecting the Pixel
- Check your Pixel ID has no typos or spaces
- Confirm the code is before </head> if installed manually
- Test in a private/incognito window — ad blockers can interfere with Pixel Helper
- If using a native platform integration, clear your site cache after saving
Google Ads shows no conversions after launching
- Conversions take up to 24 hours to appear — if you just launched or just imported, wait a day before worrying
- Check the conversion action isn't stuck as Secondary: Goals → Conversions → Summary → Goals tab → Edit goal → confirm your main action is set to Primary. Imported GA4 conversions default to Secondary, and Google won't count or bid toward a Secondary action
- Confirm Auto-tagging is ON: Settings → Account settings → Auto-tagging. Without it, Google can't connect ad clicks to conversions
- Confirm the underlying GA4 Key Event is still firing — test it in GA4 DebugView (from Step 1). If GA4 isn't recording the event, Google Ads can't import it
- Confirm Google Ads is still linked to your GA4 property: Tools → Data manager → Google Analytics (GA4)
Google Ads conversion count doesn't match your actual leads or sales
- Some difference is normal — Google attributes a conversion to the day of the ad click, not the day the sale happened, so timing won't line up exactly
- If Google shows far MORE conversions than real sales: you likely have more than one action set to Primary, or the same action counted in both GA4 import and a direct Google tag. Set only ONE Primary conversion, and don't track the same action twice
- If Google shows far FEWER: your Count setting may be wrong — check purchase is set to "Every" and generate_lead to "One" (Goals → Conversions → click the action → Settings)
- A gap of more than about 10% either way is worth investigating; small differences are expected
Meta Pixel "Lead" event not firing on /thank-you
- This is the Meta Pixel Lead event from Step 2 (not GA4's generate_lead, and not Google Ads)
- The Lead event code must be on that specific page only — not sitewide
- Confirm your /thank-you page URL is correct
- Complete a fresh test opt-in and watch Meta Events Manager → Test Events in real time
GA4 shows Direct traffic
There are two separate reasons you might see Direct traffic in GA4 — one is fixable, one is permanent and normal.
FIXABLE — your links are missing UTM parameters
- Check every ad destination URL has its UTM parameters, present and lowercase
- Test by clicking a UTM link yourself then checking GA4 DebugView immediately — the correct source should appear within seconds
- Check for redirects on your destination URL — redirects can strip UTM parameters before GA4 reads them
NORMAL AND EXPECTED — some Direct traffic will always exist
Even with perfect UTM tagging and a fully verified setup, GA4 will always show some traffic as Direct or (not set). This is a permanent feature of browser-based tracking, not a sign your setup is broken.
Even with perfect UTM tagging and a fully verified setup, GA4 will always show some traffic as Direct or (not set). This is a permanent feature of browser-based tracking, not a sign your setup is broken.
Direct traffic includes:
- Visitors who typed your URL directly or used a bookmark
- Links opened from WhatsApp, iMessage, Instagram DMs, and other messaging apps — referrer data is not passed from these sources
- QR codes without UTM parameters
- Visitors using ad blockers or private browsing mode
- Traffic from PDFs, Word documents, or other non-HTML sources
- Mobile apps that don't pass referrer data
(not set) appears when GA4 couldn't determine the source at all — usually caused by privacy settings, consent restrictions, or a session that started before the tracking tag fully loaded.
What normal looks like:
- Direct traffic under 20–30% of total sessions — normal for most small businesses
- Direct traffic consistently above 40–50% — investigate. Check UTMs are on all active links and GA4 tag is firing on every page.
- (not set) appearing frequently in your Key Events — worth investigating. Check the tag is firing on the specific pages where those events fire.
The goal is not to eliminate Direct traffic. Make sure everything you can tag is tagged and everything you can verify is verified. The rest is the natural limitation of how browsers handle referrer data.
Duplicate events in Meta Events Manager
- You have both Pixel and CAPI sending events without deduplication
- If you're on Shopify, Squarespace, or Wix/Webflow using their native integration, check you haven't also manually added the Pixel code — remove one or the other
- If you turned on the Conversions API through your platform or Meta's one-click setup, deduplication is automatic — a genuine duplicate usually means a second Pixel was added by hand. Find and remove it
- For custom implementations, add a matching event_id parameter to both Pixel and CAPI events
CAPI Event Match Quality below 5 (Once real traffic is flowing)
- Add more customer data fields to your CAPI setup — hashed email, phone number, first name, last name
- Find this in your platform's native integration settings under Advanced Matching or Customer Data
- Each additional field improves your score
- On Shopify, confirm data sharing is set to Maximum — this is the most common cause.
Search Console ownership won't verify
If GA4 is already on your site, choose the Google Analytics verification method — it verifies in one click without DNS or code.
Or, try the HTML meta tag method instead of DNS:
- Search Console → verify ownership → select HTML tag method
- Copy the meta tag shown
- Add it to the <head> of your homepage
- Click Verify
DNS verification can take up to a day — if you just added the TXT record, wait and try again
✅ Your tracking is live.
Every visit, opt-in, and sale from this point on is recorded and attributed to the right source. Your foundations are done.
 Made with Bullet